How to Make A4 Size Paper in Photoshop – When you want to print photos, documents, flyers, or something else, of course, you have to adjust the paper size first. For example, A4 paper, this size is often used for printing these purposes.
 How to Make A4 Size Paper in Photoshop 2024
It’s actually not difficult. The most important thing is that we know first, the exact size of this A4 paper.
So if you already know the width and height,
you just need to set it.
For more details, please follow
the following steps:
#1. Open Adobe Photoshop
In the first step, you can open the
Adobe Photoshop application on the PC you are using.
In this tutorial, I’m using Adobe Photoshop CC 2017.
Maybe if you use Photoshop versions CS6, CS5, CC 2019, and others, there will be a slight difference. Usually not much.
#2. Create a New Document

Once Photoshop is open, you are now
able to create a new paper.
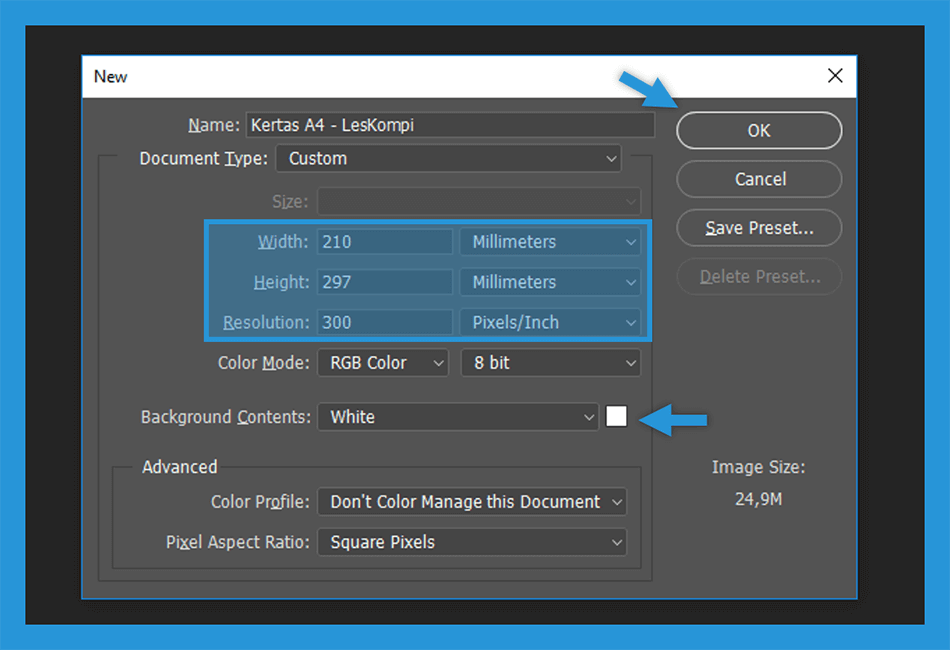
The trick is to simply click the File tab > select the New
menu. You can also use a shortcut by pressing Ctrl
+ N on the keyboard.
#3. Set Paper Size

has a use for organizing a paper in Photoshop.
Then you just need to control the size, more or less the following format.
The following sizes are A4 paper.
| Information | Size | Unit |
| Width | 210 | millimeters |
| Height | 297 | millimeters |
| Resolution | 300 | Pixel/Inch |
Tips: Especially for Resolution , you can add it as needed. Because the higher the pixel resolution , the more beautiful the resulting image.
In addition to the above settings, you
also have to make sure the Background Contents or background
must be white.
If everything is set, now
just click OK to create the new document.
How to Print Full
A4 Paper Size in Photoshop
After successfully configuring the
A4 paper size, you may also want to know how to print it.
But first, make sure you have prepared
the A4 paper on the printer machine.
If everything is set up, now
follow these steps:
#1. Select the Print Menu

First, you can open the document you
want to print via Photoshop.
Then click the File tab > select the Print menu. You can also use a shortcut to open it by pressing Ctrl + P on your keyboard.
#2. Layout Configuration
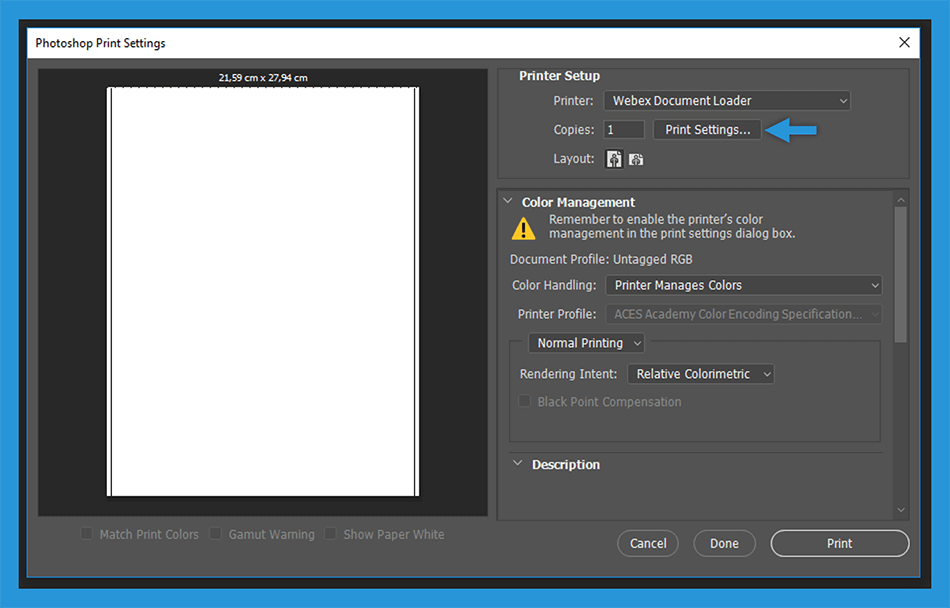
 Then the Photoshop Print
Now select the paper type in the orientation
according to your needs, whether you want to use portrait or landscape.
Then in the Page Order menu,
you can set the paper to be printed, whether you want it to be printed from the front or
the back first.
Note : You can select Front to Back to print the paper from front to back . Then select Back to Front if you want to print the paper from back to front .
#3. Select Print Color

Next, still in the print
settings menu, please select the Paper/Quality tab.
On the Tray Selection menu, you can select the Automatically Select option only. Then
on the color, you can make sure you, want to be printed in black and white
or in color.
Note : If you want black and white , you can choose the Black & White option . Meanwhile, if you want color, select the Color option .
When you have finished setting it, now click
OK.
#4. Set Printer Setup

Then you will be redirected back to the
Photoshop Print Settings dialog box. Here, you only need to control the copies
or how much paper you want to print.
We recommend that the contents according to
your needs.
In the last step, you can click the Print menu to start the process of printing the paper.
Conclusion:
This is the explanation of how to make A4 size paper in Photoshop, In short, before printing documents,
photos, paper, or anything else, you have to adjust the size first.
Maybe that’s how to make A4 paper size in Photoshop will be helpful for you.
For more articles like this one about A4 Size Paper in Photoshop, keep coming back to this blog bloggernazruul.com You can find solutions to all of your blogging, SEO, windows, android, games, and guides,-related difficulties here. Don’t forget to follow us on social media.🥰


 How to Make A4 Size Paper in Photoshop 2024


![How to Automatically Shutdown Windows 10 And 11 [2024] How to Automatically Shutdown Windows 10 And 11](https://bloggernazrul.com/wp-content/uploads/2022/03/How-to-Automatically-Shutdown-Windows-10-And-11-180x135.jpg)


