How to Disable Windows Defender Antivirus in Windows 10 – The latest Windows 10 has interesting and very complete facilities. The facilities we mean are dark mode facilities, Microsoft Edge optimization, and so on. Including the Windows 10 antivirus facility that can ward off viruses like ransomware.
How to Disable Windows Defender Antivirus in Windows 10 [2024]
Antivirus on Windows 10 is often referred to as “Windows Defender”, This Windows Defender has an important role in securing the Windows 10 system.
So that your operating system will run smoothly without any interference from viruses.
Why is that?
Because this default antivirus will delete it directly if it detects a malicious file that contains a virus.
Unfortunately, not all users like you expect Windows Defender to delete files automatically even though there is no virus in it.
That’s why we intend to provide a way to turn off the Windows 10 antivirus so that your files don’t just get deleted without confirmation.
Disable Windows Defender Antivirus in Windows 10
Before we get started, there are other basic reasons that you should know first:
#1. Application Installation
Sometimes you accidentally download a file that contains a patch to activate it.
Now Windows Defender will directly delete the patch file when the download is successfully downloaded.
Indeed, the default antivirus for Windows 10 is very sensitive to third-party files.
Therefore, you want to disable the antivirus temporarily or even permanently so that you can install the application.
#2. There are already alternatives
Even though Microsoft is really optimizing the performance of Windows Defender, there are still users who want to install a third-party antivirus application.
Why did you choose to use alternative applications? Of course, the reasons vary.
It’s just that the basic reason is that Windows Defender’s facilities are less complete than third-party antiviruses.
For example, comparing Windef with Avast, Eset, Smadav, or others, of course, you are far behind when you look at the features offered.
Therefore, instead of Windows Defender, you are useless, it’s better to try turning off Windows Defender temporarily and permanently through the following ways:
How to Turn Off Windows 10 Antivirus (Windows Defender) Temporarily
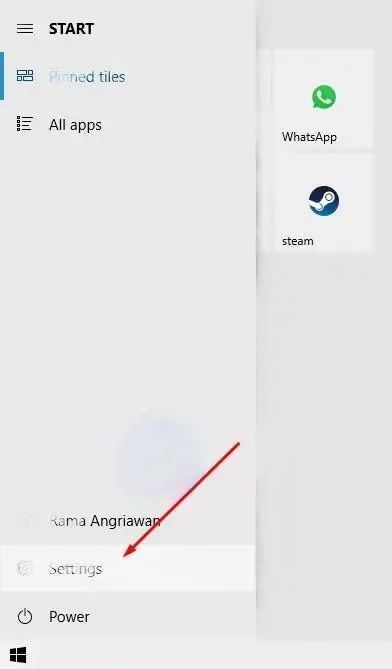
Step 1: Open Windows Settings
Opening Settings on Windows is very easy, just press the Win button to open the Start Menu, then click on the Settings option with the gear icon.

Step 2: Go to Update & Security Menu
In the next step, you only need to press to open the Update & Security menu.

Step 3: Click the Windows Security Menu
Later, several menus will appear under Update & Security. If you want to open the antivirus then select the “Windows Security” menu.

Step 4: Click Virus & Threat Protection Options
After that, point the cursor to the right window, then choose the option that says “Virus & Threat Protection”, just click once and it will open Windows Defender automatically.

Step 5: Click the Manage Settings button
Next, select the button that says ” Manage Settings “. This is the main menu used to disable the antivirus function.

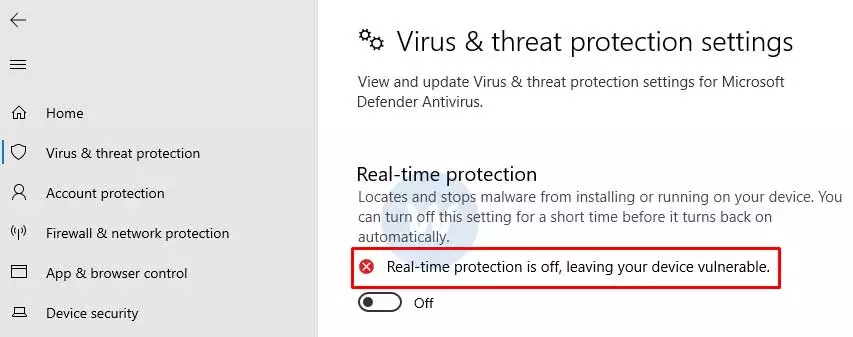
Step 6: Turn Off the Button in Real-Time Protection
You are at the end of the method, just press the button in the Real-Time Protection menu.
After pressing the button will slide to the left with a color change to gray. That’s a sign that the Windef antivirus feature has been successfully turned off.

Then the User Account Control window appears, here you can simply press the Yes button to continue.
As a result, Real-Time protection has an additional message “Real-Time Protection is Off, leaving your device vulnerable”.

How to Turn Off Windows 10 Antivirus (Windows Defender) Permanently
- Take advantage of GPEDIT
- Registry Editor
If you use the first method, the Windows Defender antivirus will only turn off temporarily.
This means that after the PC/Laptop is turned off and then the PC is turned on again, the antivirus will activate by itself.
In this second discussion, we try to provide a way to turn off Windows Defender so that it is permanently disabled.
At the same time, this method is claimed to be able to work on Windows Home Single Language, Pro, and the usual Home.
For more details, here are some choices of the right way:
#1. Take advantage of GPEDIT
Step #1: Press the Win key + R then type gpedit.msc.

Step #2: Click on the Computer Configuration -> Administrative Templates -> Windows Components folder .
Step #3: On the right, press the W key on the keyboard and look for the Windows Defender Antivirus folder.

Step #4: Locate the Turn Off Windows Defender Antivirus file then right-clicks the file to select the Edit option.

Step #5: Select the Enable option which means disable yes, not enable.

Step #6: Click OK then close all windows.
Sometimes when you select the Windows Defender Antivirus folder it doesn’t appear, that’s a sign that your Windows is still new and the settings haven’t been changed.
With the folder not appearing, you can’t disable the Windows 10 antivirus here, you have to use the second method as below.
#2. Registry Editor
Alternatively, you can use Regedit (Registry Editor) to turn off Windows Defender.
But you have to be careful in doing this because the registry file is an important component in the Windows system.
It’s just that if you follow the steps we provide, you don’t have to worry anymore. Here are the steps:
Step #1: Open the Start Menu then type Regedit.
Step #2: Choose a program called Registry Editor.
If the User Account Control (Administrator) appears, you can simply press the Yes button.
Step #3: Go to Computer\HKEY_LOCAL_MACHINE\SOFTWARE\Policies\Microsoft\Windows Defender.
Step #4: Double-click on the DisableAntiSpyware file then change the Value Data to 1.

If there is no Disable Anti Spyware file, you can create it by pressing Right click -> New -> DWORD (32-bit) Value -> Name it DisableAntiSpyware -> Double Click -> Change Value to 1 -> Done.
Step #5: Create a new file the same way as before, then name it DisableRealTimeMonitoring -> Double Click -> Change Value Data to 1 -> Done.
All of the above methods can also be used for several brands of laptops, including:
| Acer | Asus |
| Lenovo | Samsung |
| MOBILE PHONE | Dell |
| Toshiba | Huawei Notebooks |
| MSI | Apple MacBook |
By turning off this real-time protection, you only disable the Windef function temporarily and permanently.
Even so, this method is the safest way and even more so when Windows Defender does not need to be turned off if you want to use a third-party antivirus application.
Conclusion:
This is the explanation of how to disable Windows Defender antivirus in Windows 10, I hope this information is useful for all of you.
For more articles like this one about how to disable Windows Defender antivirus in Windows 10, keep coming back to this blog bloggernazruul.com You can find solutions to all of your blogging, SEO, Windows, Android, games, and guides-related difficulties here. Don’t forget to follow us on social media.🥰


![How to Disable Windows Defender Antivirus in Windows 10 [2024] 1 How to Disable Windows Defender Antivirus in Windows 10](https://bloggernazrul.com/wp-content/uploads/2022/07/How-to-Disable-Windows-Defender-Antivirus-in-Windows-10.jpg)


