6 Ways to Clear Cache on Windows 11 PC Laptop Desktop – The cache is a collection of temporary files that are stored on the system by various applications and programs to perform tasks more quickly on the next attempt. This includes Windows and browser cache. With time, the cache might start taking up a lot of storage space and affect the performance of your Windows 11 PC, which is why it is recommended that you delete it periodically.
 How to Clear Cache on Windows 11 PC Laptop Desktop 2024
However, there is no specific location on the system where all caches are stored and can be cleared in one go. It can be saved in different folders depending on the application or program that created it.
Also, read here:
- 6 Ways to Fix 0x8007012a Install Error on Windows 11
- How to Check Windows Version on Laptop PC Desktop
- 3 Ways to Open ISO Files on Windows 11 for Beginners (+Image)
Why Should I Clear Cache on My Windows 11 PC/laptop?
Clearing and clearing the Windows 11 cache will not come to your mind until you encounter problems with Windows 11 system performance. Regularly clearing the cache offers various benefits as follows:
- Clearing Disk Space: When abandoned cache files accumulate over time, they may start taking up a large portion of your hard disk. If your system is running out of memory, clearing the cache will help free up disk space.
- Improve Performance: If storage space is low, it will slow down the system. Therefore, clearing the cache will improve system performance.
- Preventing Errors: Cache files can get corrupted over time, causing various errors, some of which can crash Windows. Regular cache clearing prevents these errors and keeps your system healthy.
Now that you understand the importance of clearing the system cache, let’s take a look at the different ways you can clear the cache in your Windows 11.
Some various inbuilt programs and features help to clear the cache on your Windows 11 PC/Laptop along with manually clearing it from its storage location.
- Remove Temporary Cache Files
- Clear Cache via App Settings
- Clear Cache with Disk Cleanup
- Clear DNS Cache
- Clear Location Cache
- Clear Microsoft Store Cache
#1. Remove Temporary Cache Files
These files are created by applications when performing various tasks and should ideally be deleted automatically after the task is executed. However, this doesn’t happen often and you are asked to remove it manually.
The folder will quickly repopulate as the app continues to create these temporary files. Hence it is recommended that you clean it regularly.
To delete the Temporary Cache file, press WINDOWS+R to execute the Run command, type %temp% in the text field, and press ENTER or click “OK” at the bottom.
You can also navigate to the following path to open the folder where the temporary files are stored. In the following path, replace “USER” with the account you used to log in to Windows.
C:\Users\USER\AppData\Local\Temp
Once in the temp folder, press CTRL+ A to select all the files and then press the DELETE button or right-click on one of the files and select the “Delete” icon, to delete the files.
A confirmation box may appear for some files, please select the relevant response to complete the deletion process.
#2. Clear Cache via App Settings
There are certain other temporary files scattered throughout the system that can be easily removed from Settings. Here are the steps:
- To clear cache via Settings, right-click the “Start” icon on the Taskbar or press WINDOWS+X to launch the Quick Access menu, and select “Settings”. Alternatively, you can press WINDOWS+i to launch the Settings app.
- In the “System” Settings tab, scroll down to the right and select “Storage”.
- Wait for Windows to scan and assess the temporary cache files stored on your system. Now, click on the “Temporary files” option at the top.
- Various cache files will now be visible. Scroll down and select the files that you want to delete and click on the “Remove files” option.
- Finally, click “Continue” in the confirmation box that appears to complete the process.
The selected files will now be deleted.
#3. Clear Cache with Disk Cleanup
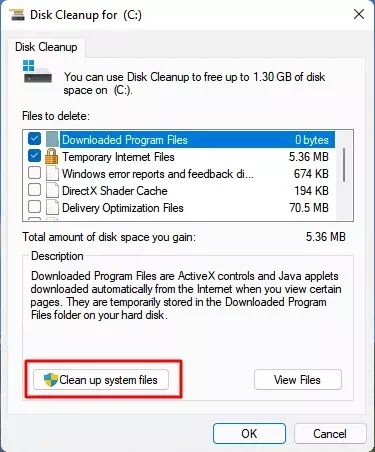
Disk Cleanup is a built-in utility that scans cache files and other temporary system files that can be removed. Here’s how to clear the cache with Disk Cleanup:
- To clear the system cache with Disk Cleanup, search for the Disk Cleanup application in the Search menu, and click on the relevant search result to launch the application.
- You will now be asked to select the drive that you want to clean. Click on the drop-down menu, select the drive and then click “OK” at the bottom. Disk Cleanup will now run a scan to identify cache files stored on your system.
- Once the scan has run, select the files you want to delete under the “Files to delete” section and click “OK” at the bottom to delete them. Choose the appropriate response when a confirmation box appears.
You can also delete system files with the Disk Cleanup app. These files generally occupy a considerable amount of storage space and cleaning them will improve system performance.
- To remove system files, click the “Clean up system files” option.
- Now, select the drive where the system files are stored, which will most likely be the “C:” drive. Now, wait for Disk Cleanup to scan and identify system files that can be removed. When finished scanning, select the files you want to delete under the “Files to delete” section and click “OK” at the bottom.
Choose the appropriate response when a confirmation box appears.
#4. Clear DNS Cache
The DNS (Domain Name System) server stores the domain names of previously visited websites to load them quickly on subsequent visits. Over time, these servers may fill up and entries may become corrupted, causing errors in loading websites. Here’s how you can clear the DNS cache.
To clear the DNS cache, search for “Windows Terminal” in the Search menu and click on the relevant search result to launch the application.
In the Windows Terminal app, the PowerShell tab will launch by default unless you have manually set “Command Prompt” as the default profile. To launch Command Prompt, click the arrow icon at the top and select “Command Prompt” from the menu. Alternatively, you can press CTRL+SHIFT+2 to launch Command Prompt.
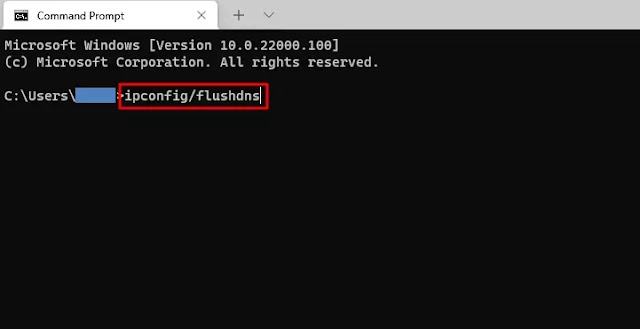
In the Command Prompt, type the following command and press ENTER to run it to clear the DNS cache.
ipconfig/flushdns
The DNS cache will now be cleared.
#5. Clear Location Cache
You can also delete location activity stored on the system.
- To clear the location cache, launch the “Settings” app as previously discussed and select “Privacy & Security” from the navigation panel on the left.
- Now, select the “Location” option under “Apps permissions” on the right.
- Next, find “Location History” and click “Clear” next to it.

#6. Clear Microsoft Store Cache
When you access the Microsoft Store and download an app, it creates a cache file. You can easily delete these files through simple commands. Let’s see how you do it.
To clear the Microsoft Store cache, press WINDOWS+R to launch the Run command, then type wsreset.exe in the text field, and click “OK” at the bottom or press ENTER.
This will open a black window with no text which will disappear once the cache is cleared, and the Microsoft Store app will launch.
The above methods are the most effective at clearing the cache in Windows 11 and will free up a considerable amount of storage space. Also, this method is useful if you encounter errors due to corrupted cache files.
Conclusion:
That’s how to clear the cache on Windows 11 PC/Laptop. I hope this article helps you! Thank you for visiting and don’t forget if this article is useful, please share it with your friends too.
For more articles like this one about Clear Cache on Windows 11 PC Laptop Desktop, keep coming back to this blog bloggernazruul.com You can find solutions to all of your blogging, SEO, windows, android, games, and guides-related difficulties here. Don’t forget to follow us on social media.🥰


 How to Clear Cache on Windows 11 PC Laptop Desktop 2024


![How to Automatically Shutdown Windows 10 And 11 [2024] How to Automatically Shutdown Windows 10 And 11](https://bloggernazrul.com/wp-content/uploads/2022/03/How-to-Automatically-Shutdown-Windows-10-And-11-238x178.jpg)


![How to Automatically Shutdown Windows 10 And 11 [2024] How to Automatically Shutdown Windows 10 And 11](https://bloggernazrul.com/wp-content/uploads/2022/03/How-to-Automatically-Shutdown-Windows-10-And-11-180x135.jpg)


![How to Automatically Shutdown Windows 10 And 11 [2024] How to Automatically Shutdown Windows 10 And 11](https://bloggernazrul.com/wp-content/uploads/2022/03/How-to-Automatically-Shutdown-Windows-10-And-11-100x75.jpg)