How to Manage Windows 10 Startup Programs – When you turn on your laptop or PC, several programs will run automatically. This program is located in a directory called the startup folder. On the Windows 10 operating system, several startup programs will be determined automatically by the system and some of them can be set by the user himself. You can disable, add, and manage which programs are allowed to run at startup.
How to Manage Windows 10 Startup Programs 2024
Why do startup programs in Windows 10 need to be set? This relates to the performance and speed of your laptop or PC when it is turned on. Reducing startup programs will speed up Windows 10.
Also, read more:
- How To Restore Classic Volume Mixer In Windows 11
- 6 Ways To Fix Missing Windows Start Menu Icon
- How To Easily Open Task Manager In Windows 10
The fewer programs that run at startup, the faster the process of starting Windows will be, and vice versa if there are too many programs running at startup, it will be heavy and make startup slow.
What are startup programs?
Startup programs are programs that run automatically when the computer is turned on. This program can come from Windows itself or from other sources (third parties) that you install on the system.
Where is the Windows 10 startup programs folder?
All programs running at startup will be collected in one folder located at:
C:\Users\Username\AppData\Roaming\Microsoft\Windows\Start Menu\Programs\Startup
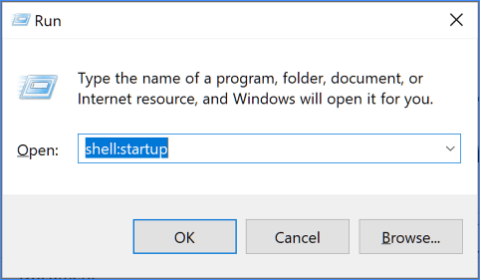
To quickly access it, you can use commands from the RUN window.
The method,
Press Windows key+R > type the command: shell: startup > click OK.
How to turn off or remove startup programs in Windows 10
If you find that there are several startup programs on your computer that you don’t think are needed or even make the system slow the first time you turn it on, then these programs can be removed from startup.
In this way, you can set which programs are allowed to run automatically when the computer is turned on so that the process of starting Windows will be faster.
Follow these steps:
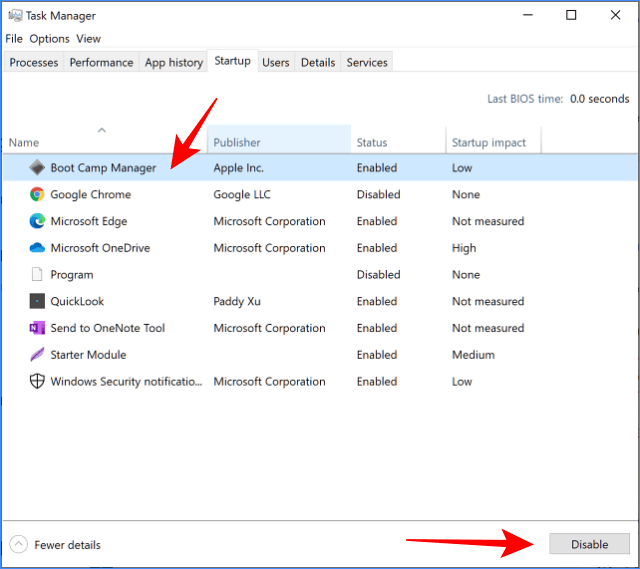
1. First open the Task Manager by right-clicking on an empty area on the Taskbar and selecting Task Manager.
2. Once the Task Manager opens click on the Startup tab.
3. There you will see all the programs that are on Startup complete with their status whether Enabled or Disabled.
4. Determine which programs you want to remove from Startup.
5. Click on the program you want to remove from Startup then click the Disable button.
6. Repeat the steps above to turn off other programs from Startup.
How to add startup programs in Windows 10
Apart from removing certain programs from Startup, we can also add any program to run automatically at Startup. The trick is to enter the program into the Startup folder in Windows 10.
You may have a certain program that you use regularly every day, or there is a certain program that you need to run automatically when the computer is turned on.
To do this then the easiest way is to put it in Startup.
There are two ways that can be used, namely using the Task Manager or adding programs manually by entering them into the startup folder.
If the program is already in the Startup list, you can use the Task Manager, but if not, you must add it manually.
#1. Using the Task Manager
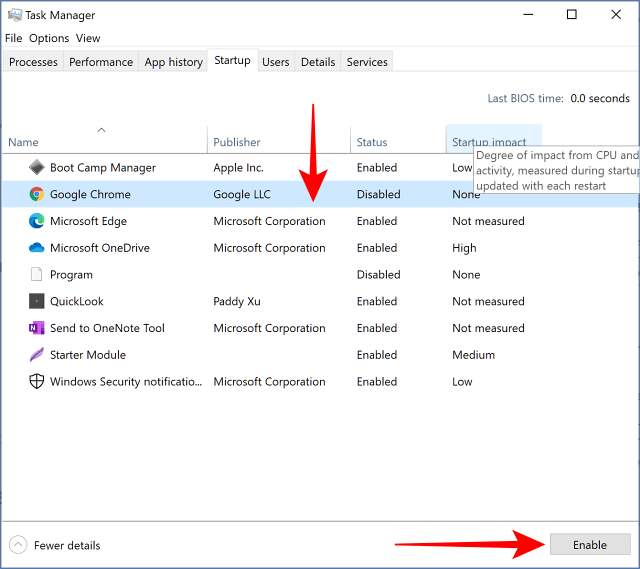
1. Open the Task Manager by right-clicking on the Taskbar and selecting Task Manager
2. Click on the Startup tab
3. Find the program you want to run at Startup
4. Click the program
5. Click the Enable button
#2. Using the Startup folder
1. Find the program shortcut you want to add to Startup
2. Right-click on the shortcut and select Copy

3. Open the Startup folder by pressing the Windows key + R then typing shell: startup > clicking OK

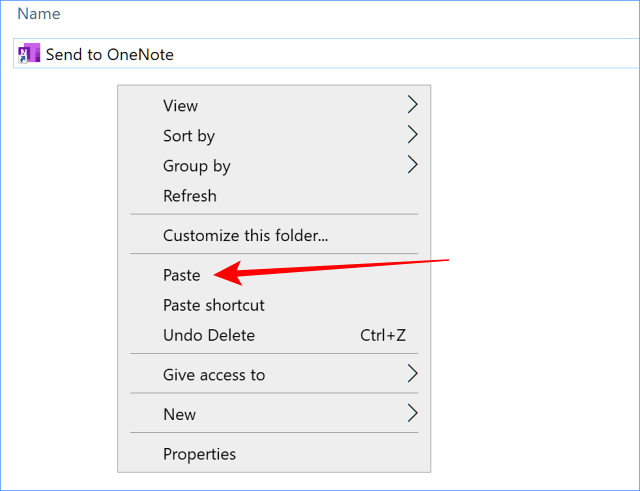
4. In the Startup folder, right-click in an empty area and select Paste
5. Restart your computer
After the computer restarts, the program will run automatically along with other startup programs.
How to make folders open automatically on startup
If there are certain folders that you use regularly and want to make them open automatically every time the computer is turned on, then you can enter them into Windows 10 startup.
Same as the method above, what we need to do is create or copy-paste the shortcut from the folder in question into the Startup folder.
Follow these steps:
1. Open the File Explorer application
2. Find the folder that you want to open automatically on Startup
3. Right-click on the folder
4. Select Copy
5. Open the Startup folder by pressing the Windows key + R then typing shell: startup > clicking OK
6. Right-click on the empty area
7. Select Paste shortcut
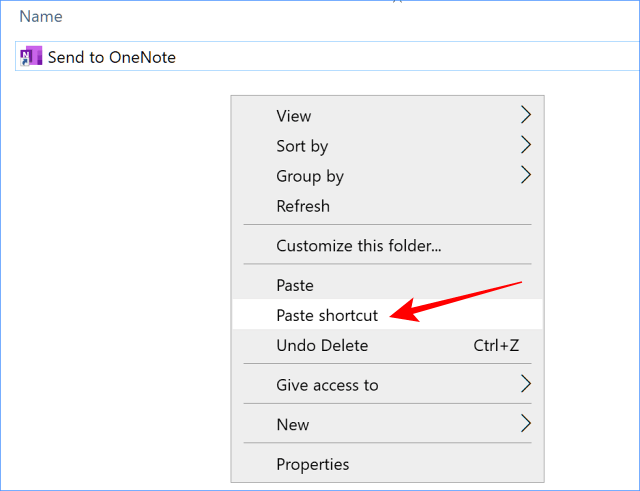
Done, now try restarting your computer and see if the folder has successfully opened automatically when entering the desktop. If it means you managed to do this trick.
Conclusion:
This is a tutorial on how to set, remove, and add applications to Startup in Windows 10.
For more articles like this one about how to manage Windows 10 startup programs, keep coming back to this blog bloggernazruul.com You can find solutions to all of your blogging, SEO, windows, android, games, and guides-related difficulties here. Don’t forget to follow us on social media.🥰


![How to Automatically Shutdown Windows 10 And 11 [2024] How to Automatically Shutdown Windows 10 And 11](https://bloggernazrul.com/wp-content/uploads/2022/03/How-to-Automatically-Shutdown-Windows-10-And-11-238x178.jpg)


![How to Automatically Shutdown Windows 10 And 11 [2024] How to Automatically Shutdown Windows 10 And 11](https://bloggernazrul.com/wp-content/uploads/2022/03/How-to-Automatically-Shutdown-Windows-10-And-11-180x135.jpg)


