9 Ways to Take Screenshots on ASUS laptops – The best ASUS laptops are renowned for their incredible, cutting-edge innovation. The battery life, display quality, durability, and other aspects of various Asus laptops have all been examined. There’s a good probability that your ASUS laptop uses Windows as its operating system.
 How to Take Screenshots on ASUS Laptops 2024
Most people believe that different devices have different snapshot features, yet practically all Windows desktops and laptops have a similar technique for taking screenshots. Sometimes just copying and pasting text is insufficient to gather the required data. You must take a screenshot of the information shown on your screen if you wish to save a visual representation of the data.
Read more:
- 10+ Best Screenshot Applications for Windows 10 PC
- 12+ Best Recommendations PC Screenshot Applications
- 10 Webcam Applications on Windows PC Laptop
The information, data, or visual representation of data that is shown on the screen of a computer or mobile device is essentially captured by the system as a screenshot. It also goes by the name “screen grab” or “screen capture” and involves taking a picture of the information that is being displayed on a screen.
We’ll go over the many methods for taking a screenshot on your Asus laptop to aid you. Each method will result in a high-quality screen capture, but the time and work required to obtain the screenshot will differ.
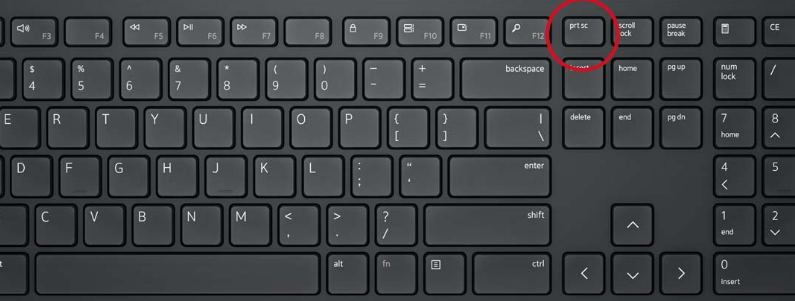
#1. Use the PrtSc key:
The entire material on your screen will be captured when you press the PrtSc key. Remember that the PrtSc button does not instantly save the picture.
You must either use image editing software or copy the content from your clipboard and paste it into a document to save the digital image.
The current image that you copied will be overwritten if you hit the PrtSc button again.
To use the Print Screen key, follow these steps:
- To take a screenshot of your computer screen, press PrtSc once.
- The clipboard will be filled with a screenshot of the whole screen.
- Press Ctrl + V to paste the copied image into Microsoft Word or Microsoft Paint.
- To modify or crop the screenshot, use either of these two applications.
- When you’re finished altering the snapshot, hit Ctrl + S to save it.
 #2. Use the Windows + PrtSc key:
On an Asus laptop, it is a more natural way to take a screenshot. The fascinating thing about capturing a screenshot in this manner is that it ensures that the screenshot was taken and stored, even though pressing the PrtSc button by itself is sufficient to do it. To take a screenshot, all the user needs to do is simultaneously hold down the Windows and PrtSc buttons.
The user is immediately informed by a screen flash that a screenshot has been taken and stored automatically. It is employed particularly when the work at hand requires a certain level of assurance that the screen and its contents were recorded because it is sensitive.
Here’s how to use the Windows + Print Screen key to take a screenshot:
- To capture your screen, simultaneously press WinKey and PrtSc.
- Wait until the animation alerts you that the screenshot was successful.
- Go to User > Pictures to access the screenshot.
- The order of your screenshots will depend on when and where they were taken.
 #3. Use the Windows + H key to screenshot and share:
Do you need to send a friend or coworker a quick screenshot? Without first saving it to your laptop, you can share a screenshot right away by pressing the Win + H keys.
For individuals who need to transmit several screenshots but don’t want to give up their computer storage, this is an excellent technique. This approach is also ideal if you want to avoid having to empty your recycle bin after every screenshot you capture.
Here’s how to send a screenshot:
- Your desired window should be opened.
- At the same time, press Win and H.
- To the right should appear a dialogue box.
- Simply choose the method you wish to use to share the screenshot right away from the sharing options.
 #4. Utilize a plugin or browser extension:
You can use a plugin or extension from the extensions store to take a screenshot of a webpage in your browser. There are many free screenshot extensions available on the Chrome Web Store if the basic screen capture methods utilizing PrtSc or the Snipping tool don’t work for you.
Typically, screen capture extensions include new functionality, including photo editing, image resizing and cropping, highlighting, blurring, cloud copy, sharing, and JPG or PNG format conversion.
The fact that most snapshot extensions aren’t just for Chrome is another fantastic feature. Some add-ons are compatible with Firefox, Opera, UC Browser, Brave, and other browsers.
Lightshot, Nimbus Screenshot & Video Recorder, FireShot, GoFullPage, and HTML Element Screenshot are a few of our favorites.
#5. Snipping tool:
Any ASUS laptop will have the snipping tool readily available. It is a unique capture tool made available by Windows and is present in all Windows OS versions. This program not only assists you in taking a screenshot but also in cropping the image to remove extraneous portions of the text.
With the traditional PrtSc option for capturing screenshots, a window will open with a variety of screenshot features, including a free-form, rectangular, window, or full-screen snip.
The Snipping Tool also supports delayed reaction, allowing you to select a region and take a screenshot in one to five seconds. The snipping tool has a few benefits over a standard screenshot choice, including the ability to create GIFs, scrolling screenshots, and save to library options.
 Here’s how to use the snipping tool:
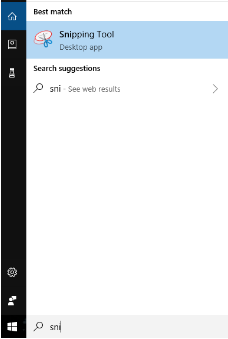
- Type “Snip” into the search box after pressing the Windows key on your keyboard. By choosing the app from the search results, you can start the program.
- Click New in the upper-left corner of the window as soon as the app has opened.
- Next, choose the screenshot mode that you want to employ. The delay feature may also be customized, and you can select between no delay and a delay of one to five seconds.
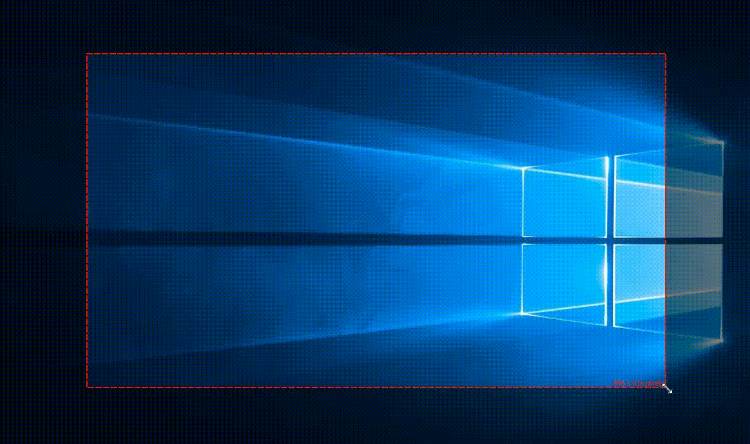
- To complete the screen capture, click and drag over the desired region of your screen. After that, release the mouse button.
- Select the folder where you want to save it by clicking Save Snip.
#6. Lightshot:
This application provides a simple technique for taking screenshots, but make sure to install it first so that the Lightshot icon shows up in the Windows taskbar.
The screen you wish to screenshot must be chosen, and then you must click the Lightshot icon on the Taskbar menu. Using the mouse on your laptop, you then choose the region to be captured.
After choosing the image and saving it by selecting the diskette icon or logo, save it using the PNG, JPEG, or BMP format that is offered.

Lightshot can be downloaded and installed from the official website.
- Launch Lightshot by clicking the icon in the system tray.
- To capture the active window, use “Alt” + “Print Screen” or “Print Screen” to capture the full screen.
- If necessary, edit the screenshot.
- On your computer, save the screenshot.
#7. Jing
Jing applications aren’t all that different from other screenshot programs when it comes to capabilities and tools. Additionally, it can capture the screen display for up to five minutes. Simply choose the Capture Video menu from the Menu option to start. PNG is the only format offered for saved picture types, though.
 #8. Schirmfoto
The application’s benefits include the ability to store screenshots in high definition and a variety of file formats, including JPG, PNG, and PDF.
The laptop’s screenshot tool can record screencasts of videos, which is a plus. You can adjust additional characteristics by cropping, and printing, including watermarks, markings, and other things.
Its relatively small size, which is only 5MB, and compatibility with Windows XP, Windows 7, Windows 8, and Windows 10 are issues.
Simply click the camera button to start using this application, and the picture will be saved without your intervention. You can also use Schirmfoto to take the picture you want.
 #9. On an Asus laptop, how can I edit and annotate screenshots?
It makes sense to learn how to snap a screenshot on an Asus laptop. Depending on your requirements for screenshotting, you have a variety of solutions. The most important decision when using an Asus laptop is how to capture the screen. Despite being easily available, the built-in PrtSc tool does not have enough customization options or functionality to be used as the default screen capture tool.
For this reason, we advise utilizing a third-party application like ScreenRec. Within a single program, you have numerous capture possibilities, editing tools, and simple shareability. You can test out ScreenRec by downloading it for free.
Conclusion:
Few people are aware of all the different methods available for taking screenshots. Knowing the various approaches can help you save time and give you the freedom to tailor the screenshot feature to your needs.
- Use the PrtSc key if you need to take a screenshot of your full scream.
- Use the Snipping Tool to capture scrolling, moving, and freeform screenshots.
- Use the Windows + H key to submit an immediate screenshot for sharing.
- Download an extension from the Chrome store if you want versatile screenshot tools for capturing online content.
These are a few methods for taking a screenshot on an Asus laptop running Windows 10. I hope this advice will be helpful to you. You can leave a comment below with any questions you may have about this post, and we will respond right away.
For more articles like this one about Take Screenshots on ASUS Laptops, keep coming back to this blog bloggernazruul.com You can find solutions to all of your blogging, SEO, windows, android, games, and guides-related difficulties here. Don’t forget to follow us on social media.🥰


 How to Take Screenshots on ASUS Laptops 2024
 #2. Use the Windows + PrtSc key:
 #3. Use the Windows + H key to screenshot and share:
 #4. Utilize a plugin or browser extension:
 Here’s how to use the snipping tool:


 #8. Schirmfoto
 #9. On an Asus laptop, how can I edit and annotate screenshots?


![How to Automatically Shutdown Windows 10 And 11 [2024] How to Automatically Shutdown Windows 10 And 11](https://bloggernazrul.com/wp-content/uploads/2022/03/How-to-Automatically-Shutdown-Windows-10-And-11-180x135.jpg)


