How to install the Google Play Store on Windows 11 PC – After information circulated that the Windows 11 operating system was able to run Android applications without using an emulator, this time new information appeared that might be an update from previous knowledge. That is how we can install GPS or Google Play Services on Windows 11 via WSA or Windows Subsystem for Android.
How to Install Google Play Store on Windows 11 PC 2024
As we know, the big drawback that we feel when we want to install Android applications on Windows 11 is the absence of the Google Play Store and the malfunctioning of the Amazon App Store in the Indonesian region.
Read more:
- How To Fix Your Windows license will expire soon
- How to Check Windows 11 Update Via PC Health Check
- 3 Ways To Fix Windows 10 Slow Shutdown Issue
- How to Automatically Shutdown Windows 10 And 11
This makes us only able to install Android applications via ADB Sideload. However a developer named ADeltaX found a way to install the Google Play Store on Windows 11 that works normally without any problems.
Before doing this tutorial, make sure you have activated the Virtual Machine Platform and Windows Hypervisor Platform in Windows Features and have removed the Windows Subsystem for Android if you have previously installed them.
How to Install Google Play Store on Windows 11 Laptop PC
1. Download the modified Windows Subsystem for Android file
If you still have the original WSA version, make sure you delete the version and then download the modified version below
Download windowssubsystemandroid.zip
2. Extract the file you have downloaded to partition C:

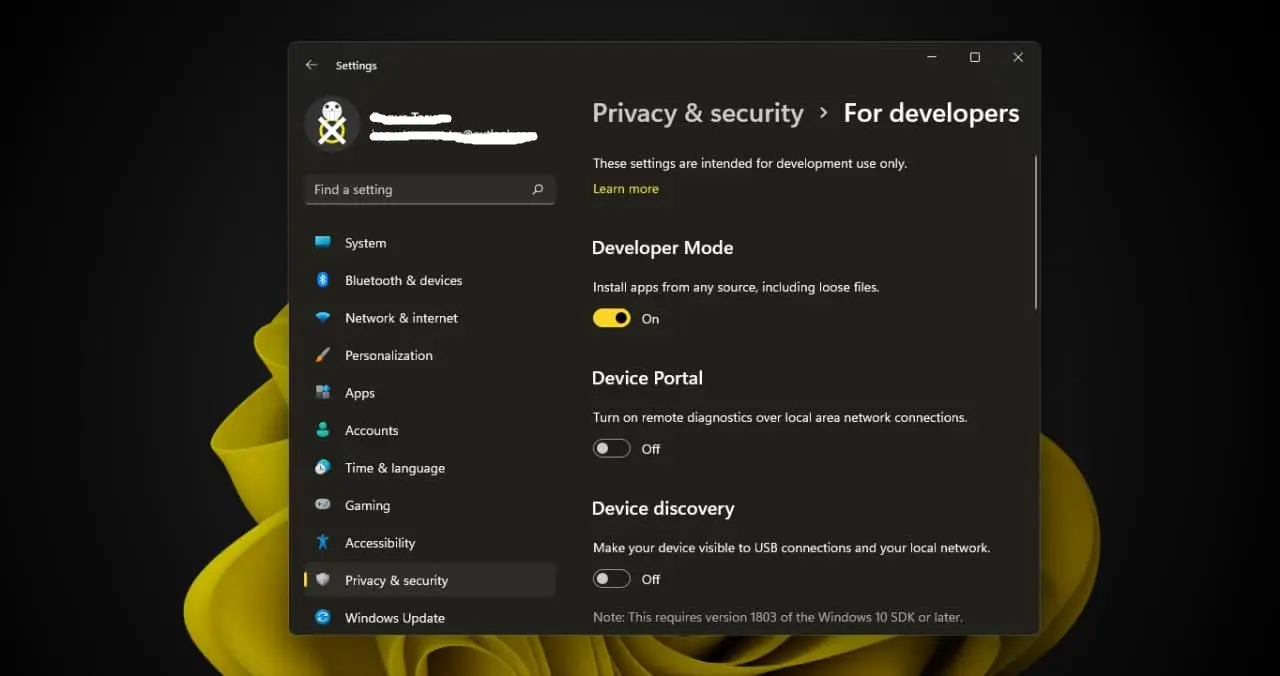
3. Enable developer mode in Windows settings.
4. Then open Windows PowerShell and install WSA.
Make sure you open Windows PowerShell in admin mode then enter the following command
Add-AppxPackage -Register *location*
Add-AppxPackage -Register C:WidowsSubsystemAndroidAppManifest.xml
5. Open Windows Subsystem for Android to turn on Developer Mode.
6. Then open Files at the top option to get the IP Address.
7. The Google Play Store will appear in the Start Menu.
8. Login to Google Play Store
9. Google Play Store has been installed on your Windows 11 and can be used normally. But there are still some things that need to be replaced in the file manager.
Rename the following files:
Open Windows File Manager then open this folder
C: WindowsSubsystemAndroidTools
Change the “kernel” file to “kernel_root” and
Change the file “kernel_bak” to “kernel”
Conclusion:
After you perform the steps above, it means that you already have a Google Play Store with Google Play Services working on your Windows 11 device. Please note this step is not an official step released by Microsoft so make sure you know and understand the risks of doing this tutorial.
If there are problems or questions regarding How to Install the Google Play Store on Windows 11, please write a comment.
For more articles like this one about how to install the Google Play Store on Windows 11 PC, and Their Meanings, keep coming back to this blog bloggernazruul.com You can find solutions to all of your blogging, SEO, Windows, Android, games, and guides,-related difficulties here. Don’t forget to follow us on social media.🥰


![How to Automatically Shutdown Windows 10 And 11 [2024] How to Automatically Shutdown Windows 10 And 11](https://bloggernazrul.com/wp-content/uploads/2022/03/How-to-Automatically-Shutdown-Windows-10-And-11-180x135.jpg)


